Mostrando las entradas con la etiqueta Debian. Mostrar todas las entradas

jueves, 2 de junio de 2016

Installation of MathGL 2.3.5 In Debian

Installation of MathGL 2.3.5 In Debian

Motivation

Despite that MathGL is included in the official Debian repositories, It is not the latest version, and the installed, library includes a lot of wrappers and features I'm unlikely to use.

What is MathGL?

As the official website states, MathGL is,

  • a library for making high-quality scientific graphics under Linux and Windows.
  • a library for the fast data plotting and data processing of large data arrays.
  • a library for working in window and console modes and for easy embedding into other programs.
  • a library with large and growing set of graphics.

Here you can see a gallery with MathGL graphics

I've used this library several times from long time ago (like in this project of Hodgking-Huxley action potential) and I think is a very nice library to generate graphics from your final binaries. For example, I've used it when my code is up and running and I want it to generate graphic output directly (png,pdf,...)


Installation

First of all, download the latest source from here, and then proceed to get the required prerequisistes.

Prerequisites

The list of prerequisites depends a lot on what you'd like to do with MathGL. I wanted to be able to work with Qt5 widgets, pdf output,gsl support (GNU Scientifical library),OpenMP, MPI, HDF5, and wxWidget support. I've installed the required libraries as root by,


To see the complete list of supported features you can read the CMakeLists.txt and look for every line containing option(enable-XYZ) so you add -D enable-XYZ when you call cmake.

Building MathGL

Once you've installed the prerequisites, you can build MathGL at the root directory of the source or simply a build directory. I like more the build approach since keeps the source directory clean.


Any errors during the cmake phase can be related to the lack of any prerequisite so keep an eye on the errors, they often say what needs to get installed or fixed.

If everything goes fine, you finally install MathGL as root by,

make install

And that's it.

Resources


martes, 24 de mayo de 2016

Neovim: Next generation vim


Motivation

I was wandering the web looking for some vim plugins that feature golang syntax and autocompletion. I found out about the neovim project and got interested on it, cause I'm a vim user. Here's what I've found.


Neovim?

Official Neovim webpage states,

Neovim is an extension of Vim: feature-parity and backwards compatibility are high priorities. If you are already familiar with Vim, see :help nvim-from-vim to learn about the differences.

After using it for more than a week I gotta say it's worth to use it. The customization is way to easy, as for performance neovim loads faster than my vim (this could be due to the installed plugins or other setups, though). The installation of plugins is pretty easy with the aid of vim-plug which can be installed by a single curl request from the command line.


Installation and use of Plugins

Detailed instructions of installation are located on my repo https://github.com/Daniel-M/nvimConfigFiles where I store my neovim configuration files. The Readme describes all steps to get Neovim up and running in Debian.


References

lunes, 25 de abril de 2016

Updating all pip/pip3 installed packages

Motivation

I've been looking for several options to upgrade my local python packages installed via pip. I've read some posts at stackoverflow and some github.com issues addressing different ways to upgrade them, but I was not very satisfied. I tried to make things on my own and here's how I did it.


Updating pip/pip3 packages

I knew that the command list of pip/pip3 consoles return the list of locally installed python packages. Just needed to take that output, process it and use it to feed pip/pip3 itself in order to get the packages updated.


I hope you find this useful!

sábado, 9 de abril de 2016

Script for automated text translation in Linux*

* I'm working with GNU/Linux Debian, but it should work ;)

Motivation

Some times you are reading stuff on books, documents, or simply the web. I know it sucks to keep opening new tabs on your browser in order to get translations for some words you don't understand. A Friend of mine told me about some script that can be bound to a keystroke combination, popping out the meaning of the highlighted text.

There are several of such scripts on the web, so making one by myself wouldn't be smart righ? Wrong!. I've tried some of them and all of them lack of features like checking that the clipboard is not empty or setting some limit for the size of the text to be translated or something like checking the languages involved in the translation(It could be useful every now and then). Besides it proved to be a good bash excercise for me.


How it works?

The operation steps are:

  • Check the contents of the primary clipboard. This clipboard always stores the text selected with thw mouse pointer at X sessions.
  • Queries a translation of the contents to google translator api
  • Formats result and makes a call to notify-send to deal with notifications daemon who shows the translation

Take a look at the script here

Making things work

Download the script and place it somewhere like /usr/local/bin give it execution permissions and bind the executable to some key combination that you will press each time you need to translate a selection of text :D

martes, 17 de febrero de 2015

Set the application to open magnet links on Google-Chrome

Motivation

As a Google-chrome user I wanted to know a way to set up the system to open the magnet links.
Firefox/Iceweasel users know that Firefox handles the default applications by itself, but Google-Chrome (and i think that Chromium) lies on xdg-open. So we need to tell xdg-open how to deal with magnet links

Finding your torrent application

To find your favorite torrent application you must go to 
/usr/share/applications/
And look for a file like 
your_favorite_torrent_app.desktop
In my case It was 
transmission-gtk.desktop
You must check that the file contains the following lines (for my case, transmission-gtk)

...
Exec=transmission-gtk %U
Icon=transmission
Terminal=false
TryExec=transmission-gtk
Type=Application
StartupNotify=true
MimeType=application/x-bittorrent;x-scheme-handler/magnet;
Categories=Network;FileTransfer;P2P;GTK;
X-Ubuntu-Gettext-Domain=transmission
X-AppInstall-Keywords=torrent
Actions=Pause;Minimize;
...

The lines in bold are the important.

Configuring xdg-open

If everything is alright you can call xdg-mime command as root
# xdg-mime default transmission-gtk.desktop x-scheme-handler/magnet
wich tells xdg-open that magnet links should be opened with transmission-gtk.

That's it, all you have to do is test that everything went ok by opening a fancy legal torrent magnet link.

References

lunes, 16 de febrero de 2015

Youtube and HTML5 with no sound on Google Chrome

Youtube video players were switched to use HTML5 instead of the old known flashplayer plugin (more infomation here).
I don't know why it seems that the sound works if you use PulseAudio as your sound layer, but if you use only ALSA (as me, cuz PulseAudio s*cks and wraps around ALSA which I consider unnecessary), the sound migth not work well (In my case it was working very nice but then was gone).

The solution for google-chrome is to start the browser with the option

--try-supported-channel-layouts

So call google-chrome as

$ google-chrome --try-supported-channel-layouts

And play a nice youtube video, if that works for you, Nice!!, You can edit the menu entries and links to google-chrome adding the mentioned command option.

Sound resampling 

Resampling can be another issue (I can not tell about that but google product forum talks about it), some forums suggest to add the option --disable-audio-output-resampler, so another solution could be calling google-chrome as

$ google-chrome --disable-audio-output-resampler --try-supported-channel-layouts 

If that does not help you... Well... F*ck... 

Remarks


  • By the time i tested the solutions my google-chrome version was 40.0.2214.94 (64-bit).
  • I choose to use ALSA system only cuz is more resources efficient and allows the use of very fancy plugins like alsa-equal (reviewed on an earlier post)

sábado, 14 de febrero de 2015

Desktop notifications with notify-send - a mini how-to

Sometimes is useful to put pop-up messages on running scripts, for example when running a back up or anything else, in order to get informed about the progress. The command discussed here is

notify-send

A nice notify-send pop-up message


Display pop-up messages as ordinary user

Supposing that you have an script for make a back-up of your personal documents as

#!/bin/bash
cp -r /home/user/documents /home/user/backups/

And you want to know when the backup has finished without checking the console.

All you have to do is adding a line such as

notify-send "BackUp Completed!" "Hi peasant, the back up process is done"

So the new script looks like

#!/bin/bash
cp -r /home/user/documents /home/user/backups/
notify-send "BackUp Completed!" "Hi peasant, the back up process is done"

To see more options read the man page for notify-send.


Display pop-up messages as root

Supposing that you run the script as root and your wall username is user, yo can add this line to your script

export DISPLAY=:0.0 && sudo -u user notify-send "MsgTitle" "Message"


martes, 24 de diciembre de 2013

Accede a las particiones ext2/ext3/ext4 desde Windows

Como usuario de sistemas multiboot Windows/Linux, sé cuanto apesta la situación en que se necesita acceder a algún archivo de mis particiones ext4 de Debian, pero he iniciado el PC en Windows. La única solución que encontraba consistía en reiniciar el sistema y acceder a Debian directamente

Recientemente me enteré de la existencia de Ext2 File System Driver for Windows, un programa muy liviano que instala un servicio (el equivalente en Windows de los daemon de Linux), que me permite acceder a las particiones Ext4 desde Windows 7. El soporte para lectura de datos está completamente soportado, pese a ello, el soporte para escritura de datos está aún en fase experimental. (Nota: No probé la escritura de datos, así que no comento nada al respecto)

Instalando y configurando Ext2Fs


El proceso de instalación es igual que cualquier programa en Windows, (la rutina de "Siguiente, Siguiente, Siguiente... Finalizar")
Una vez instalado, al iniciar el programa tendremos la siguiente interfaz

Aquí aparece habilitada la unidad (E:)  que corresponde a mi /home en Debian.

Selecciono la partición de interés y elijo la opción "Change drive letter" lo cual es necesario para habilitar la partición

Se abre un menú como este. y elegimos "Add" para añadir una letra para la partición.
Aparece la "E" puesto que ya había configurado mi partición, pero este menú debería estar vacío inicialmente.

Luego de presionar "Add" nos aparece esta ventana donde podemos elegir  la letra para la nueva partición que Windows debe reconocer, además del método de montaje. Yo elegí el modo automático, pero es posible destinar un punto de montaje permanente.

Una vez terminamos de definir la letra de partición y la letra que la identificará, finalizamos el proceso con el botón "Ok" y el botón "Done" a continuación.


Para habilitar el acceso a la(s) unidad(es) recién creada(s) debemos seleccionar "Tools" en la barra de menú y elegir "Service Management" en el menú desplegable

Debemos presionar el botón "Start" (que aparece deshabilitado en la imagen) para que el proceso inicie.
Una vez finalizado el proceso anterior deberíamos ver las unidades creadas al abrir el explorador de Windows. Aquí vemos la unidad (E:) y como Windows la reconoce como un sistema de archivos EXT3

Enlaces de interés


  1. Sitio web del proyecto http://www.ext2fsd.com/
  2. Repositorio en sourceforge http://sourceforge.net/projects/ext2fsd/
  3. Descarga directa http://sourceforge.net/projects/ext2fsd/files/latest/download

miércoles, 6 de noviembre de 2013

Skype 4.2 en Debian Testing 7 (Jessie)

No soy usuario asiduo de los servicios de VoIP, pero en las peripecias de la vida terminé con una cuenta en Skype [1]. Como Debianita, decidí darle una oportunidad a Skype en mi sistema.

Desde la versión 6.0 de Debian se implementó la modalidad "multiarch"*[2] que permite correr aplicaciones de distintas arquitecturas en un mismo sistema,por ejemplo y como en mi caso, tener el sistema amd64 y correr el Skype que viene destinado a arquitecturas i386.

Deste este enlace es posible descargar Skype, la opción sería "Debian multiarch" lo que nos descargará un .deb que tendremos que instalar con dpkg.
Una manera alternativa sería ejecutar desde la consola el comando

$ wget -O skype-install.deb http://www.skype.com/go/getskype-linux-deb

Para instalar el paquete es preciso habilitar la arquitectura i386. Con permisos de super usuario (root) añadimos la arquitectura usando el comando

# dpkg --add-architecture i386

Luego actualizamos el almacén de paquetes para incluir los paquetes de la arquitectura i386

# apt-get update

Si utiliza el sistema PulseAudio para administrar el sonido ( como lo requiere el entorno XFCE4 por ejemplo) se recomienda instalar la librería libpulse para i386

# apt-get install libpulse0:i386

Ahora, instalamos el paquete .deb que descargamos usando dpkg (Sobra decir que debemos estar en el directorio que contiene dicho archivo, y que el nombre que uso aquí es ilustrativo, para mi caso fue skype-debian_4.2.0.11-1_i386.deb)

# dpkg -i skype-descargado.deb

Reportará que hay dependencias insatisfechas, lo cual resolveremos con

# apt-get -f install

Con lo cual finaliza la instalación.


Edición(04-Abril-2015)
Puede ocurrir que Skype no encuentre alguna librería, en mi caso fue la librería compartida "libGL.so.1".
La solución fue instalar la verión i386 de la librería libgl para mi tarjeta gráfica, disponible en los repositorios de Debian. Si skype no inicia, usando el comando "ldd" en el ejecutable ("/usr/bin/skype") puede revelar las librerías faltantes.


Referencias


  1. www.skype.com
  2. https://wiki.debian.org/Multiarch
  3. https://wiki.debian.org/skype
*La definición que da la Debian-Wiki es la siguiente
Multiarch is the term being used to refer to the capability of a system to install and run applications of multiple different binary targets on the same system. For example running a i386-linux-gnu application on an amd64-linux-gnu system. This example is the most common case, but many other working combinations are possible, such as armel and armhf.
Multiarch also simplifies cross-building, where foreign-architecture libraries and headers are needed on a system during building.

miércoles, 30 de octubre de 2013

Cuando el instalador de Debian falla...

Hoy decidí realizar una instalación limpia de Debian (a la fecha Jessie/Testing), con una lista depurada de los paquetes que si uso.
Para el proceso de instalación descargué la ISO del primer DVD para instalación del Debian Testing (usualmente contiene todos los paquetes necesarios para una instalación sencilla y con cualquier gestor de ventantas) cree una USB booteable ( el típico cat Debian.iso > /dev/sdX hay muchos tutoriales en la red, así que no entraré en detalles)
La instalación funcionaba muy bien hasta llegar a la parte de detección de hardware de red. En este punto la instalación se colgaba y no avanzaba más. 

Cual fue la solución?[1]

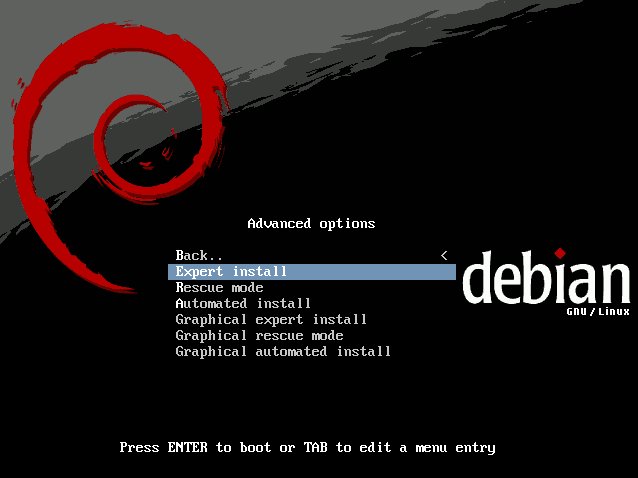
Iniciar la instalación en modo experto (expert install) puede ser en modo gráfico o en modo consola, una vez allí, seleccioné la opción 

Selección del modo experto.
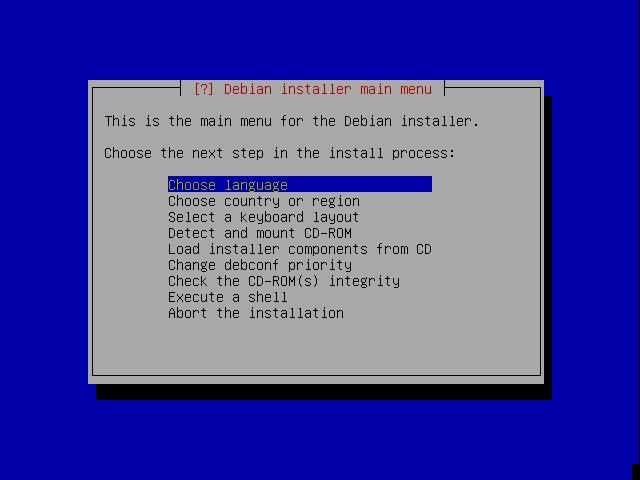
A continuación buscamos una opción para abrir una consola (Execute a shell)

Execute a shell - la penúltima opción.
Se abre una consola de bash que debemos utilizar para editar un script interno del instalador

$ nano /bin/check-missing-firmware

Se abrirá un editor de texto donde la primera línea debe decir

#!/bin/sh

bajo esta línea escribimos

exit 0

para que el script termine antes de ejecutarse. Acto seguido, presionando Ctrl+o y luego Ctrl+x  salimos del editor. En la terminal escribimos 

$ exit

Para continuar con el proceso de instalación, seleccionamos la opción "choose language" (Elegir lenguaje) y continuamos cada item de la lista en secuencia hasta llegar a "Load installer components from CD"

Execute a shell - la penúltima opción.
Al abrir esta opción, no seleccionamos nada y le damos continuar, de ahí en adelante seguirá el proceso estándar de instalación. Estos simples pasos me sacaron de un gran lío y por ello merecieron una entrada en este blog.

Fuentes

jueves, 15 de agosto de 2013

Dropbox on a multiboot system with Debian

Motivation

Many Linux users might have problems when using the cloud synchronization tool known as Dropbox on a multiboot system. The problem arises when trying to have a Dropbox set-up on both Windows and Linux OS arising "syncronization issues", if you tried this before, you'll understand.
So i searched for solutions to this "issue", but all the proposed ways to solve it were... well, not so elegant for me.

The way i got dropbox working both on Debian GNU/Linux and Windows (same PC)

A little 'bout context

I've already have a Windows-7 OS installed, with a working Dropbox installation at

D:\Daniel\Dropbox

Without having a working installation of Dropbox at Debian.

Making symbolic links on Linux

On Debian, I've the "D:\" windows partition as "/dev/sda5", and is mounted on

/media/Disco-Local/

I wanted to have my Linux-Dropbox folder at

/home/damejia/Dropbox

So work with those locations. Given the context, boot Debian and open a terminal, to login as superuser type

$ su

It will ask you the "root" password. Then, do the following

# ln -s  /media/Disco-Local/Daniel/Dropbox  /home/damejia/Dropbox

This will create a link between both paths, so, the /home/damejia/Dropbox points to  /media/Disco-Local/Daniel/Dropbox

Change the group and the owner of the link created (in my case, the user is damejia)

# chown -R damejia  /home/damejia/Dropbox
# chgrp -R damejia  /home/damejia/Dropbox

We are ready to install Dropbox

Intalling Dropbox on Debian

Then, download the latest version of Dropbox for Debian (they have the .deb), and, from the console install the packe using dpkg (as root, is worth noting that you must be on the same directory as the package)

# dpkg -i dropbox-x.x.x-amd64.deb

On the first run of Dropbox on Debian, it will ask you for the folder to store the syched files. choose

/home/damejia/Dropbox

That is, choosing the link we created before. And... that's it, the Dropbox must appear as synched, since you haven't added files, you will have the same Dropbox path on either Windows or Linux.

jueves, 8 de agosto de 2013

System sound equalized with ALSA for Debian - Get-yo-self equalized!

(Still working on 2015. See workarounds at the end)

Motivation

Like many people, i really enjoy listening music, an, as many would know, having an equalizer can make a really big difference between "the ordinary experience" of listening music.
It's clear that many media players include plugins for audio enhancing, but, whan happens when you listen a music video on youtube, or just simply using grooveshark cloud music service?. For Windows machines the solution could be installing audio-enhancing software like DFX (A really good one, i can tell). But that kind of "stuff" isn't available for Linux. Maybe 'cause we have other kind of solutions, i have found one that works amazing, but you must have ALSA installed on your Linux distribution.

What is the ALSA System?

Many of you may wonder, hows that your Linux Distro communicates with your speakers/headphones/microphon/any-sound-device. Well, there are many ways to get the task donde, but, for Debian distributions (So, for the wide set of Debian-based distros like Ubunty, Mint, and so on) the ALSA system do the job. In words of Wikipedia [1]:
Advanced Linux Sound Architecture (known by the acronym ALSA) is a free, open source software framework released under the GNU GPL and the GNU LGPL[4] that provides an API for sound carddevice drivers. It is part of the Linux kernel. Some of the goals of the ALSA project at its inception were automatic configuration of sound-card hardware and graceful handling of multiple sound devices in a system, goals which it has largely met. A couple of different frameworks, such as JACK, use ALSA to allow performing low-latency professional-grade audio editing and mixing.
So

ALSA Equalizer

Getting the equalizer installed

Installing from repos (Debian Testing and Sid)

In the Debian Testing repositories we have the package libasound2-plugin-equal

The plugin on my Debian repository

In order to have the equalizer installed, as root, do:
# aptitude install libasound2-plugin-equal alsamixergui

  • libasound2-plugin-equal - The equalizer itself
  • alsamixergui - A GUI To control de plugin, but it's optional, cause you can use the command-line alsamixer. Unfortunatetly the only way to control the equalizer is to make use of the alsamixer utility

Manual Installing

For other linux distros, download the latest version of the plugin from here (look for "download")
Then, choose a folder and do

tar xvjf alsaequal-x.x.tar.bz2
cd alsaequal-x.x
make
sudo make install
You should read carefuly the reference [2]

Getting the equalizer to work

Single user

Into your "home" directory ("/home/user" for instance) create a file called ".asoundrc" and paste this code onto it (for more information see [2] and [3] from the references section below)
ctl.equal {
  type equal;
}
pcm.plugequal {
  type equal;
  # Modify the line below if you don't
  # want to use sound card 0.
  slave.pcm "plughw:0,0";
  # or if you want to use with multiple applications output to dmix
  # slave.pcm "plug:dmix"
}
# pcm.equal {
  # Or if you want the equalizer to be your
  # default soundcard uncomment the following
  # line and comment the above line.
 pcm.!default {
  type plug;
  slave.pcm plugequal;
}
Then, as root, you must do

# alsa force-reload

So the sound daemon restarts and loads the plugin. The equalizer should be working now.

Whole system (all users)

You must create the file

/etc/asound.conf

And paste this code onto it (for more information see [2] and [3] from the references section below, take a look at [4] too)
ctl.equal {
  type equal;
}
pcm.plugequal {
  type equal;
  # Modify the line below if you don't
  # want to use sound card 0.
  slave.pcm "plughw:0,0";
  # or if you want to use with multiple applications output to dmix
  # slave.pcm "plug:dmix"
}
# pcm.equal {
  # Or if you want the equalizer to be your
  # default soundcard uncomment the following
  # line and comment the above line.
 pcm.!default {
  type plug;
  slave.pcm plugequal;
}
Then, as root, you must do

# alsa force-reload

So the sound daemon restarts and loads the plugin. The equalizer should be working now.

Using the equalizer

The plugin installs a "virtual" audio device. This device is called "equal" (for obvious reasons).
If you followed the steps above, you shouln't have problems now.
To change the equalizer configuration, you must tell ALSA that you want to work with the "equal" device, so open a terminal and write either

$ alsamixer -D equal


This is how it looks on command line
or

$ alsamixergui -D equal


This is how it looks using alsamixergui

And choose your best audio configuration, and enjoy your audio-enhanced linux distro.

Some Workarounds (edit: 2015-Feb-04)


The above instructions still worked for me (I've resintalled Debian Testing on my PC on January of 2015), but I've noticed two little workarounds that might be of importance if you have more than a sound card or you have been experiencing no sound with web pages as youtube using google-chrome.

More than a soundcard

I've changed my motherd board and has two different sound cards which caused my system to direct the equalized sound stream to the "wrong" sound card.

Thanks to this post [7] I became aware of the need of tweaking the file /usr/share/alsa/alsa.conf in order to get ALSA using the "right" sound card.
If the working sound card is hw:0,1 and the "bad" sound card is hw:0,0, and you used hw:0,1 on your asound.conf as stated on the sections above, but still without equalized sound, you need to tell ALSA that start using sound card 1 (i.e. hw:0,1 in our example) on the file /usr/share/alsa/alsa.conf by changing the following lines:
defaults.ctl.card 0 to defaults.ctl.card 1
defaults.pcm.card 1 to defaults.pcm.card 1
defaults.rawmidi.card 1 to defaults.rawmidi.card 1
defaults.hwdep.card 1 to defaults.hwdep.card 1
defaults.timer.card 1 to defaults.timer.card 1

Youtube and HTML5 on google-chrome

Youtube video players were switched to use HTML5 (google it for more information). I don't know why the sound layer works if you use PulseAudio but if you have only ALSA, the sound migth not work (for me it was working anddd... the sound was gone).

The solution for google-chrome is to start the browser with the option

--try-supported-channel-layouts
So call google-chrome as

google-chrome --try-supported-channel-layouts

And play a nice youtube video, if that works for you, you can edit the menu entries and links to google-chrome adding the mentioned command option.
Resampling can be another issue (I can not tell about that but google product forum talks about it), some forums suggest to add the option --disable-audio-output-resampler, so another solution could be calling google-chrome as

google-chrome --disable-audio-output-resampler --try-supported-channel-layouts 
If that does not help you... Well... F*ck. 

References

  1. http://es.wikipedia.org/wiki/Advanced_Linux_Sound_Architecture
  2. http://www.thedigitalmachine.net/alsaequal.html
  3. http://wiki.linuxmce.org/index.php/Equalizer_for_ALSA
  4. http://www.alsa-project.org/main/index.php/Asoundrc
  5. http://packages.debian.org/source/sid/alsaequal
  6. Download my asound.conf 
  7. https://coderwall.com/p/wajiaq/replacing-pulseaudio-with-alsa-linux

viernes, 19 de abril de 2013

Lector de PDF nativo de Google Chrome en Chromium - Caso Debian GNU/Linux

Posiblemente una de la excusas más comunes para usar Google Chrome en lugar de Chromium, es la ausencia de un lector de PDF embebido en el navegador.
La solución que muchas personas indican es instalar una aplicación para leer PDF en Chromium. Puede que funcione para algunos, aún así, me sigue pareciendo una solución poco elegante.
Me he enterado recientemente que es posible mejorar el navegador Chromium añadiendole el mismo lector de PDF de G-Chrome.
Esta solución es muy antigua, pero me tomé la libertad de publicar una entrada en español al respecto.

Manos a la obra

Por alguna razón en los repositorios de Debian (Testing almenos) aparecen los paquetes
chromium  y chromium-browser, aún así el "hack" es bastante sencillo.

Primero se necesita disponer de un paquete de instalación de G-Chrome actual.
El truco consiste en extraer de G-Chrome, la librería que contiene el lector de PDF embebido.
(Para los perezosos, he habilitado un enlace de decarga a mi libpdf.so para la arquitectura de 64 bits de Chromium, no tengo la versión del navegador de la cual tomé la librería, pero es del mes de Marzo(2013). Actualicé el enlace usando la librería G-chrome versión 40.0.2214.94 (Feb 2015). Declaración No me hago responsable del uso indebido de este archivo ni de las consecuencias de su uso.).
Para cualquiera de los casos siguientes, debe tener privilegios de root para modificar los directorios.

chromium instalado 

Solo se requiere colocar la librería mencionada anteriormente en el directorio
 /usr/lib/chromium/
de manera que se vea  /usr/lib/chromium/libpdf.so

chromium-browser instalado

Solo se requiere colocar la librería mencionada anteriormente en el directorio
/usr/lib/chromium-browser/
de manera que se vea /usr/lib/chromium-browser/libpdf.so


Probando el lector

Al reiniciar el navegador, en la barra de direcciones del navegador escribimos
chrome://plugins/
Notaremos de inmediato que aparece un plug-in asociado a la librería, y por defecto, debería estar activado (Si no, lo habilitamos).
El Plug-in se activa al reiniciar el navegador

Al abrir un PDF, deberíamos tener el mismo lector de Google Chrome, solo que usando Chromium.

Vemos que se trata de Chromium

Tiene exactamente las mismas características que para el navegador Google Chrome


Apostilla

Al interior de estos directorios puede existir una carpeta llamada plugins, si desea puede colocar la librería allí, por motivos de organización y estética fundamentalmente

viernes, 12 de abril de 2013

Flash Player plugin problems in Google-Chrome under Debian GNU/Linux

SOME CONTEXT


I'm using Debian GNU/Linux. Some day on the month of February(2013), the flash player plugin suddenly stopped working in the google-chrome web browser. I've noticed the glitch when I used some web pages as groveshark.com and youtube.com, they suggest me the use of HTML5 given the “lack” of a flash player plugin. 


FACTS


The package flashplugin-nonfree was installed (yeah, i know about Gnash, but i still prefer the non-free version)

No system update were performed, so the problem was not caused by package conflicts.


FINDINGS


Given the facts above, the search begun, i found that Google Chrome uses his own flashplugin version (named flashpepperplugin), independent of the system installed version (flashplugin-nonfree for the Non-free case).
A way to check the plugins, is type chrome://plugins/ in the search/url bar of the browser, then activate the option “Details” (a + on the left-top corner) and allow a version to execute  (system version 11.2 series, and chrome version 11.5 series. at February 2013). a Sensitive path is ~/.config/google-chrome/ the chrome plugin is located at the path PepperFlash

SOLVING THE PROBLEM

I think that the problem was that both flash versions available (system version 11.2 series, and chrome version 11.5 series. at February 2013) so I choose the system version as activated, and deactivated the chrome version. That made flash player plugin work fine.
But, another solution is to use the Chromium browser instead of Google Chrome. That was the solution of my choice, not only solved the problem, I really feel tha Chromium is much faster with an efficient system resources consumption.

To install chromium, just use aptitude as root (su)

# aptitude install chromium
Or by any other package manager, look for chromium.